
Ensuring a Dry and Smooth Surface: The First Step in How to Paint a Ceiling
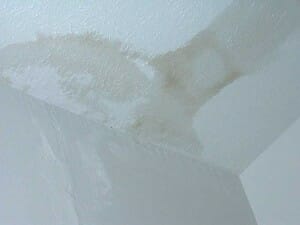
When dealing with a leaky roof, the aftermath can be quite a hassle. Along with fixing the leak, you’re left with unsightly water stains marring your beautiful ceiling. But don’t despair! Giving your ceiling a fresh coat of paint can breathe new life into your room.
Before you even think about painting, make sure the leak is fully repaired. Nothing’s worse than doing all the work, only to see water stains appear again. Once you’re sure the leak’s fixed, it’s time to tackle any stains, blisters, or bumps on the ceiling.
These spots can ruin your paint job if you don’t take care of them. Use a putty knife to gently scrape away any blistered paint or bumps.
Then, fill these areas with drywall or spackling compound. Wait for it to dry. Once dry, sand the area lightly. It’s important not to sand too hard—you want to see a smooth ceiling.
Priming the Way: The Role of Stain Blocking Primer
Primer is like a magic barrier—it covers those stubborn water marks and makes your ceiling ready for new paint. You can’t skip this part. The best choice is an oil-based primer. It’s strong enough to cover those water stains for good.
While some primers are made just for ceilings, an oil-based primer works for most jobs. When you prime the ceiling, remember to keep your space well-ventilated. Open the windows, turn on the fans—do whatever you can to keep the air moving.
When the primer is dry, you can start painting. The key to a great paint job is multiple coats. Don’t be tempted to cut corners here or you’ll regret it later. Give your ceiling two coats of paint (or more if needed) and allow for drying time between coats.
Getting Hands-on: How to Paint Ceiling with Paint Roller and Brush
Now comes the fun part—painting! But first, protect your room. Spread out drop cloths on the floor, and cover your furniture with them too. You can also use painter’s tape around any fixtures to protect them from accidental splatters.
There are many types of paint, but some paints are specially designed for ceilings. These paints go on in one color, like pink or blue, but dry to white. This helps you see if you’ve missed a spot.
When you’re ready to paint, grab your paint roller and brush. Dip your roller into the paint tray and start painting.
Roll slowly and evenly. For those hard-to-reach spots, use an extension pole. Use the brush to cut into the corners and edges. It’s a bit of work, but before you know it, you’ll have a freshly painted ceiling!
Mastering the Edges: Tips for Painting the Edge of the Ceiling
Painting the edges of your ceiling can be a bit tricky. But with a good paint brush and some patience, you can achieve a smooth, clean line. Start by painting the edges where the ceiling meets the wall. This is known as ‘cutting in’.
For textured ceilings, a nap roller comes in handy. This type of roller has a longer pile, allowing it to hold more paint and navigate the texture of your ceiling better. Don’t forget to carefully paint around any light fixtures, too.
From First Coat to Dry: The Journey of a Coat of Paint
How long does it take for a coat of paint to dry? It usually takes about 24 hours, but it could be less or more depending on the paint and the conditions in your room.
It’s worth waiting, though, because applying multiple coats of paint can give your ceiling a rich, even color. When applying the second coat, roll in a direction perpendicular to the first coat. This can help avoid any streaking.
The Finishing Touches: Perfecting Your Ceiling Painting
To ensure a flawless finish, there are a few extra steps you can take after painting your ceiling. Once the ceiling is painted, be sure to promptly clean up any spills or splatters while the paint is still damp. It’s much easier to clean wet paint than dry paint, and this will help you achieve a pristine look.
Once the paint has dried, take a moment to inspect your ceiling under various lighting conditions. You might notice some areas that appear slightly lighter than others. If that’s the case, simply apply an additional coat of paint to those spots to achieve a consistent and even color throughout your ceiling. This attention to detail will guarantee a professional-looking result that you’ll be proud of.
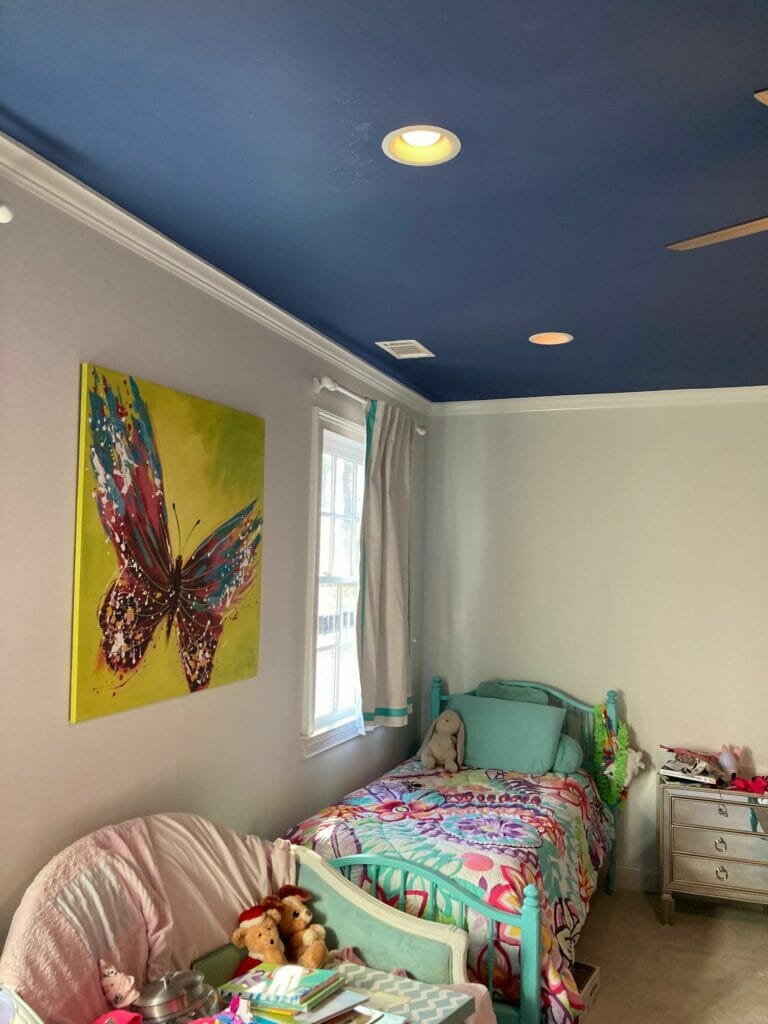
A Room Transformed: How Painting a Ceiling Enhances Your Space
You’ve done it! You’ve transformed your room by painting the ceiling. Not only have you covered up the water stains, but you’ve also given your room a fresh, new look. Now, make sure to remove any painter’s tape and perform the final clean-up. From painting a room to a whole house or commercial business, our team at BCI is here to ensure that you get the perfect finish. With our experienced professionals and high-quality products, you can rest assured that your job will be done right. So if you’re ready for the transformation, give us a call today! We look forward to hearing from you.