Overview: The Benefits of Primer
One of the most powerful tools in your professional Athens painting contractor’s arsenal is what goes underneath the paint – the primer. Primer is an excellent problem-solver that’s less like paint and more like glue. It sticks to whatever you’re prepping and turns it into a smooth, uniform surface that’s ready for paint, making your interior or exterior painting project much more professional looking.
If you’ve ever walked down the primer aisle at your Athens home center, you know the primer choices are mind-boggling. To cut through the clutter, we asked three professional painters, each with 20-plus years of experience, to give us their recommendations for the best primers to use for common painting challenges. Their experience will help you choose the best primer for the job, so your paint will look better and last longer.
Problem 1: Interior Stains and Odors
Some stains will bleed right through most primers and paints no matter how many coats you apply. The same goes for severe odors like smoke from fires and cigarettes.
The solution is stain-blocking primer, which is available in oil-based (alkyd) and water-based (acrylic-latex) versions. Oil-based versions give off a nasty smell and require paint thinner for cleanup, but they’re more reliable for blocking water-based odors and stains like rust, nicotine, smoke, wood tannins and, of course, water (see “Shellac: The Original Primer,” below, for dealing with severe stains and odors).
Water-based stain-blocking primers offer easy cleanup and less odor and come in low- and no-VOC (volatile organic compounds) formulations. These work best to block solvent-based stains like crayon, grease, ink and scuff marks. Both versions are white, so it’s a good idea to tint them gray or close to your topcoat color if they’ll be covered by dark-colored paint.
Problem 2: New Drywall
The mud used on the seams of drywall absorbs paint differently than the rest of the drywall. This difference in porosity can cause blotchy, dull areas under the paint (a problem called “flashing”) and an inconsistent sheen. Prevent this problem by using a drywall primer-sealer.
If you’re an ace drywall finisher and your walls are perfectly smooth, you can use a standard drywall primer-sealer. But if you’re like most of us, your finished drywall probably has some tiny pockmarks, fine ridges and scuffed paper from sanding. The solution to those minor imperfections is a “high-build” drywall primer-sealer. This heavier-bodied primer-sealer is a little more expensive than standard primer-sealer, but it does a better job of leveling and filling in rough or uneven drywall construction. (Sorry to say that not even a high-build drywall primer can hide a terrible tape job.)
Alternatively, if your drywall is relatively smooth and the topcoat is going to be a flat paint, you can skip the primer and use two coats of high-quality self-priming water-based flat paint. The heavy-bodied paint resins in self-priming paints seal the surface and fill imperfections (which are less visible in flat paint anyway).
Tip: Paint within 48 hours of priming. Many primers are formulated to physically and chemically bond with the paint applied over them. Once you’ve primed, you should paint over it within a couple of days or it will lose its effectiveness and you’ll need to prime again.
Problem 3: Moisture-Prone Areas
The high moisture in areas such as your Athens kitchen, closets, bathrooms and laundry room can cause paints to mildew, flake or peel. Interior moisture moving outward through the wall can cause peeling, bubbling or blistering on exterior walls as well. Use a vapor barrier primer to seal the surface and minimize the passage of moisture through the walls to the outside. If mildew is a serious concern, use a stain-blocking primer to prevent mildew stains from bleeding through the topcoat and then use a topcoat that specifically resists mildew (check the label). Make sure to kill any mildew with a one-part bleach and three-parts water mixture before priming.
Problem 4: Repaired Walls
Like new drywall mud, wall patches absorb paint differently than the rest of the wall. To prevent flashing, cover everything from dabs of spackle to broad patches of joint compound with a good-quality drywall primer-sealer. However, if you have plaster rather than drywall, any repairs you make will need a coat of oil-based stain-blocking primer. Without it, lime stains will form around the repairs and will bleed through the topcoat. This applies to tiny caulking and spackling touch-ups as well as major repairs with joint compound.
Problem 5: New Interior Bare Wood
It’s important to prime bare wood to seal the thirsty surface, hide imperfections and bind the wood fibers to make the surface more uniform. Slower-drying oil-based primers, such as an enamel undercoat primer, provide better adhesion and are easier to sand than water-based primers. If you use a water-based primer, it’s likely to raise the grain of the wood and require more sanding before you apply the topcoat.
Problem 6: Medium Density Fiberboard (MDF)
Use an oil-based primer unless the MDF comes preprimed. Don’t use a water-based primer, which can soak into the surface and cause it to swell. Before priming, sand the surface smooth and make sure it’s dust-free. Prime all surfaces, including the board edges.
Problem 7: Previously Painted Interior Woodwork
If the old paint is in good shape, there’s no need to prime. But if the paint is chalking or is chipped, use an oil-based enamel undercoat primer after properly prepping the surface. An enamel undercoat primer bonds well to previously painted surfaces and improves the topcoat by flowing out to a dense, smooth uniform foundation without laps or brush marks. Fast-drying primers like shellac and many water-based products dry too quickly and become brittle. This can cause lap marks and makes it harder to sand and get a smooth base for the topcoat. Oil-based primers sand well but dry more slowly (some can take 48 hours or longer). If you want to use a water-based product, look for a high-build acrylic-latex enamel undercoat that’s specifically designed to be sanded.
Problem 8: Drastic Paint Color Change
When you change from a light color to dark or vice versa, it can take many coats of paint to hide the existing paint color. Tinting your primer gray or a color similar to your finish paint reduces the number of topcoats you need to apply to get good results. Not all primers can be tinted darker colors, so make sure to choose one that can. Even without a drastic color change, tinting your primer gray will help enhance the color of most dark-colored interior paints and improve a primer’s “hide” (how well it covers the imperfections and color of your wall surface).
Problem 9: Exterior Wood
Exterior paint takes a beating. And one of the best ways to extend the life of your Athens paint job is with a good primer. So unless you enjoy scraping paint, spend about $30 per gallon on a top-quality acrylic/latex exterior primer. Look for “100 percent acrylic” on the label, and make sure the wood surface is clean, dry and dull (no sheen). On properly prepared walls, a high-quality primer can double the life of your exterior paint job.
Tip: Use a primer and paint from the same manufacturer. Many primers are formulated to work best with certain paints.
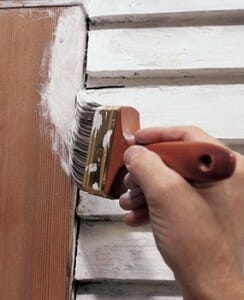
Problem 10: Old Exterior Paint
If exterior paint is in great shape, there’s no need to prime. But that’s hardly ever the case. At the very least, you’ll have to spot-prime any bare wood where the paint has peeled away. Use a high-quality acrylic/latex exterior primer. And if the paint is “chalking,” you’ll have to prime the entire surface. To detect chalking, just wipe the paint with a rag. If the rag picks up colored dust, you’ve got chalking. Before you prime, thoroughly scrub and power-wash the siding. Peeling areas with dirt and mildew must be cleaned, scraped or sanded before priming. Preparation is the key to a long-lasting paint job. If it’s not done correctly, the surface will peel again within a year or two.
Problem 11: Exterior Woods that Stain
Cedar, redwood and a few less common woods contain lots of pigments called tannins that will bleed through standard primer and paint. To stop the bleeding, use an oil-based stain-blocking exterior primer for larger areas and top with an acrylic/latex finish coat. If you’re going to use an oil topcoat, use only an oil-based primer. However, thanks to new water-based paint formulations, you can paint an acrylic/latex topcoat over either an oil- or water-based primer.
Article Source: https://www.familyhandyman.com/DIY-Projects/Painting/Painting-Techniques/painting-how-to-choose-and-use-primers